The Sunday just gone we were given a small water bottle full of worm liquid AKA worm wee or if you want the technical name, leachate. This supposedly good liquid fertilizer (which needs to be diluted probably one to ten parts water depending on how strong it is) is basically the run off from a wormery and different from worm tea that you hear about which is a brew made using worm castings. We will keep you updated on how we get on with it.
We did a google search for wormeries which took us to this great article about alternative composting methods from the great Bob Flowerdew on his website. There is a little bit on worms but there’s far more on other novel methods. Have a look herefor the article. Through this we found a great page of links of Bob’s gardening articles called Best of Bob. Have a butcher’s here for some informative reading!
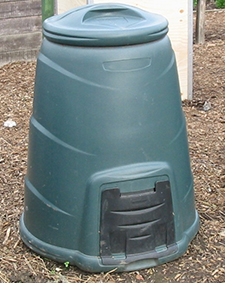
We spent an enjoyable hour out the back this afternoon just before the light began to fade and the air got colder. We did have plans of what we were actually going to do beforehand but an unknown force (guilt perhaps?) made us get a garden fork and head down the Dalek bin and give the heap one last turn.
Things are slowing up down there and the egg boxes we didn’t rip up a few weeks ago had to be done as half an large egg box don’t break down half as well as tiny pieces of egg box especially now that winter is nearly upon us.
Whilst turning with the fork using an ungloved hand our knuckles were grazed on the side as usual. When will we ever learn that those Daleks are okay but nothing beats your wooden made square bin with some carpet thrown on the top as a lid.
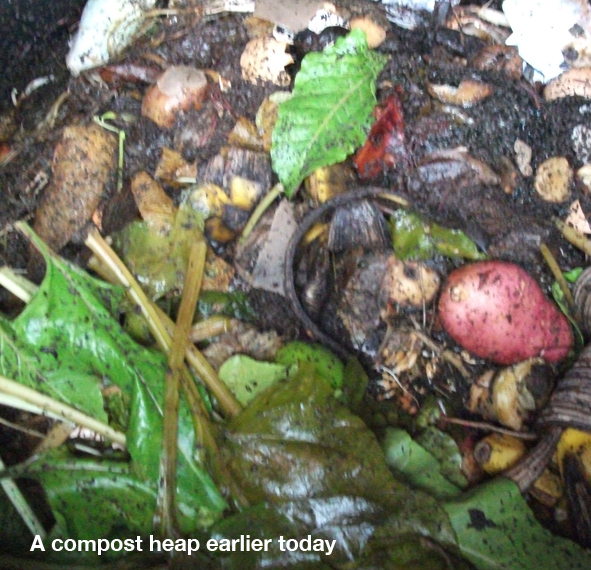
Compost ingredients in the picture above includes (fact fans): guinea pig straw (plus waste), egg boxes and a couple of sprouting onions. We’ll lift the lid off in the spring to see how it has progressed.
The next job if we get the time soon is to clean up the pond a bit as it’s looking a bit rough. We think it may have sprung a small leak as the brick to the bottom right of the pond has been visible for a long while now even though over the past few months we’ve had a bit of rain. The oxgenating plant that has taken over needs a clear out too. Pond life eh? It never stops!
Here’s 900 words from us at Weeds for“a forthcoming project”. When it comes to composting, in the words of the Desperate Bicycles, it was easy, it was cheap. GO AND DO IT!
One of the best things you can do as a gardener – especially one on a budget – is to make your own compost and, contrary to popular belief, it’s easy to do. It’s an inexpensive way of putting goodness back into your garden, especially if you don’t regularly feed your soil.
It is one of the finest soil improvers there is; it can be forked in, left on top of the earth for the worms to work in or even made into a tea and applied as a liquid. Adding compost provides a slow-release supply of nutrients and elements, feeding plants over a long period of time. It adds structure to the soil, helps to retain its moisture and feeds the worms and micro-organisms, keeping the ground in good shape. A great exchange for recycling some home waste.
Some gardeners seem to be put off making compost, thinking it will smell to high heaven, attract all sort of vermin or fear they will be left with a pile of garden waste that will never rot. I was one of those people but have been converted to compost production after learning the hard way; I’ve opened the lid of the bin to receive a faceful of fruit flies (always open the lid away from you!), came face to face with a rather large roadent happily napping on top of the heap and have only recently disposed of my first attempt that had been sitting around for years consisting of sticks and prunings wider than the thickness of my finger.
When you compost, fungi and aerobic bacteria initially eat the waste matter in the pile – the carbon and nitrogen content a source of their energy and protein – creating carbon dioxide and heat. When the pile cools, worms – alongside varying insects – reduce it further by eating what is left and pass it through their guts. Soil organisms then break it down again and ripen the material turning it into compost.
There are lots of structures on the market for composting but many are not an option for a gardener doing it on the cheap, though local councils supply plastic Dalek-shaped bins free as part of their recycling campaigns. These keep the rotting waste in and unwanted vermin out but because of their size can be difficult to mix (something you should do regularly to add air, a component needed in the process).
A composting container can be made out of wood – the classic square-shaped enclosure with a top to shield off the rain – or although not aesthetically pleasing, the waste can be just left to rot in a pile (which will probably not please the neighbours). Whatever method you use, it should be placed somewhere easy to get to, possibly screened from view and preferably in a position where it will get some sunlight which will add heat to the pile helping it to rot. In an ideal situation you would have two (or more) bins on the go, one started the year previously now yielding compost and the other for putting recent waste in.
The ingredients used in composting are “greens” (ones containing nitrogen) and “browns” (carbon) combined with water and air. Examples of “greens” include: grass clippings (applied sparingly as they turn to a smelly mush if used too thickly), plant waste (no flowering weeds or diseased material) and kitchen waste (vegetable peelings, ripped-open teabags and over-ripe fruit). The “browns”: cardboard, ripped or scrunched-up newspaper and small twigs (nothing larger than 1/4” unless put through a shredder). Cooked foods, fats and meats should be avoided at all costs unless you want to attract vermin and be very wary of putting salad leaves from left-over meals if meat has been on the same plate too. This is possibly where I went wrong which attracted the sleeping visitor to my pile thus giving me a fright in the process so be extra careful with what you add. No matter how prudent I am though when filling the bin I still manage to find when the compost has matured some strange stuff: the odd ballpoint pen, elastic band and on one ocassion a plastic Dr Who sonic screwdriver, usually prompting me to say “How did THAT get in there?”
Most important is to get the balance of ingredients right. It does vary depending on what gardening books you read or which gardening guru you follow but a 50/50 ratio of “greens” and “browns” will suffice. You simply add layers of material – ideally alternating “greens” and “browns” – one to two inches deep, interspersed with a light layer of soil every so often. Turning the pile regularly using a garden fork makes sure that it doesn’t get compacted and that air can circulate freely. If the compost looks too wet, smells foul or attracts fruit flies this indicates there’s too much “green” material, so more “browns” should be added. If the pile has dried out – especially during the summer – more “green” material and a little water will correct it. Worms should come naturally to your heap – especially the red brandling ones – but if you want to add more, lay down some wet cardboard in your garden and in a week you should have a few on the underside to put in the pile. Don’t worry they will multiply!
Depending on how much heat is generated in the heap and how balanced the materials are, you should be the proud owner of home-made compost in around a year. If you want to speed up the process there are compost activators – basically extra nitrogen – on sale at garden centres, but this can be done for free by adding nettle, comfrey and borage leaves which will in turn add more varied nutrients to the finished product. Another activator is human urine, best applied out of a plastic bottle for obvious reasons.
You will know when your compost has fully matured when it has a crumbly texture, an earthy smell and looks as described in an old gardening book,“rich like a Christmas fruit cake”. This pile of gardening goodness is now ready to be applied to your soil.
There’ll be times when things won’t seem to go right with your compost heap but once you get it correct and see the results you get from using it, you won’t want to look back. Your garden will thank you for it in kind and you will soon be growing the healthiest looking flowers, fruit and vegetables and will never yearn for pay-through-the-nose-farmers-market-produce ever again. You will then realise why home-made compost is known in the gardening world as “black gold”.
Top 5 bonkers things that can go into a compost heap 1. Nail clippings.
2. Human hair.
3. A pair of old leather shoes. Ta for Scarlett for telling us about that!
4. An old cardigan in a Val Doonican stylee.
5. Beer dregs.
I spent a couple of hours in the back garden today dodging the old boy next door (he wants me to cut back my apples trees) and started my third attempt at a compost heap. With two behind me, one woody and as dry as a bone, the other formerly a smelly slush but since adding more “brown” material, it’s now on its way, I’m making sure I go by the book with this one.
In the new year I’ll be attending the composting course at walworth garden farm for pointers in the right direction but in the meantime, no twigs or woody material, getting the right mix of “greens” and “browns” and adding the material in two inch layers into the free plastic bin I got off the council.
It was filled to about three quarters of the way full with layers of shredded newspapers, kitchen peelings, leaves, nettles, a few handfuls of rotting material with writhing worms from the other heap and a unmentionable liquid to start it all off. Fingers crossed!
There will be irregular updates of how it’s getting on.
Talking about compost, there’s a free composting course next month (and in the new year) at the Walworth Garden Farm with Scarlett Cannon.
On the course you’ll learn about compost making with a focus on worm composting as this is best suited to those living in an urban environment where growing space may be extremely limited. Sounds well up our street!
One of the best things you can do for your garden is to make a compost heap. It’s a brilliant way of putting something back into the earth for next to nothing!
When you add compost you’re not just improving the soil, you’re supplying plants with nutrients and elements, helping retain moisture in the ground and encouraging wildlife into your garden who will enjoy the warmth and protection of the heap. How good is that just for recycling your kitchen peelings!
A simple compost bin can be made from wood (the classic slatted version that you can add height to as the heap progresses), bricks and old carpet (definitely one to be kept out of view as even good quality Axminster will look crap after a few months outdoors!) There’s also the black plastic darlek type which some councils supply for free as part of their recycling package.
It’s best to keep the heap somewhere you can get to it easily, possibly screened off but in a sunny position as that will help add heat to the pile. Ideally you’d have two bins, one started the year or so previously which you will be using now and one that’s in the process of rotting down.
When filling the bin, put the various ingredients in layers of two or three inches deep to stop it turning into a big slushy mess which can happen when masses of lawn clippings are added. You can always add a thin layer of soil every now and again to help it along too. Turning with a fork every few months will benefit the pile, making sure it is not too compact so that air can circulate throughout it which ensures it rots down easier. Also check that the heap doesn’t dry out in the summer as moisture is also needed too.
To start off the rotting process you can use nettles, comfrey leaves and even human urine (better out of a pre-filled bottle I reckon, or your neighbours will be on the phone to the police!). As the material decomposes, the pile will start to create heat, so why not do like they did in victorian times and make a hot bed? It’s a compost heap with a raised bed on top which is kept warm from the rotting material below. Failing that if it’s in full sunlight, stick a courgette or a cucumber plant on the top of the heap which will thrive with the richness underneath.
What to add:
Shredded paper/newspaper (no glossy mags)
Used tea bags
Eggshells
Coffee grindings (free from coffee shops)
Autumn leaves (no evergreens)
Garden waste and clippings (softwood prunings, nothing too thick or woody or use a garden shedder on them)
Annual weeds that haven’t set seed
Old bedding plants
Overripe fruit and veg peelings (no cooked food or meat which will encourage vermin)
Nettles and comfrey leaves (which will help the composting process no end)
Dead flowers
Grass clippings
What not to add:
Perennial weeds, bindweed and ivy which can re-sprout from their roots or stems
Sawdust
Pet waste
Diseased plants (burn them alongside the woody prunings if you can’t afford that shredder)
One tip is don’t stick in woody stems like I did, as a couple of years on I am still pulling out sticks, so be warned! Also once you’ve got a heap in progress, get into the habit of sticking your peelings into a closable container in the kitchen which you’ll later transfer to the heap.
I’m fighting with my pile at the moment as it’s a bit wet and smelly, so I’ll be leaving out the “green” material and adding more “browns” like shredded newspaper and leaves etc. Composting might be an art form but when you get it right, it’s well worth it!


 We did a google search for wormeries which took us to this great article about alternative composting methods from the great Bob Flowerdew on his website. There is a little bit on worms but there’s far more on other novel methods. Have a look here for the article. Through this we found a great page of links of Bob’s gardening articles called Best of Bob. Have a butcher’s here for some informative reading!


 There are lots of structures on the market for composting but many are not an option for a gardener doing it on the cheap, though local councils supply plastic Dalek-shaped bins free as part of their recycling campaigns. These keep the rotting waste in and unwanted vermin out but because of their size can be difficult to mix (something you should do regularly to add air, a component needed in the process).
 A composting container can be made out of wood – the classic square-shaped enclosure with a top to shield off the rain – or although not aesthetically pleasing, the waste can be just left to rot in a pile (which will probably not please the neighbours). Whatever method you use, it should be placed somewhere easy to get to, possibly screened from view and preferably in a position where it will get some sunlight which will add heat to the pile helping it to rot. In an ideal situation you would have two (or more) bins on the go, one started the year previously now yielding compost and the other for putting recent waste in.


